How to Use a Local LLM in VS Code
Set up Ollama, a local model and the Continue extension for private, offline AI coding assistance in VS Code, no cloud service or massive GPU required.
Table of Contents
We all know Copilot, Codex, Antigravity, and the other AI helpers available in our editors of choice. But what if your project is sensitive, you want to test local or modified models in a controlled lab, or you need to work without an internet connection?
This short guide shows how to use Ollama, a local LLM, and VS Code for local AI coding assistance, without a cloud tool or even an internet connection. And no, you do not need a massive GPU to get started.
Basic Setup
The steps below are for macOS, which in my view makes the most sense for local AI. On a Windows machine with a reasonable GPU, the initial steps are similar.
First, we need Ollama, the de facto standard for local AI, especially on laptops. Install and start it from a terminal (I use Homebrew):
brew install ollama
ollama serve
ollama serve keeps running in that terminal window and prints a short status summary, including the maximum VRAM and other technical details. Leave this window open.
Next, open a second terminal window and download the model of your choice. In my case it is a Dolphin-Phi based model:
ollama pull dolphin-phi:latestThat covers the most important part: Ollama is installed, a model is on your machine, and you can talk to it locally. When configured correctly, prompts and code are processed entirely on your machine. Check the concrete settings and telemetry options yourself if you need a 100% local workflow.
VS Code Integration
To use the local model in VS Code, install the Continue extension from the VS Code marketplace.
Once installed, open Continue’s configuration file (~/.continue/config.yaml) from within the extension and add your model. Which entries you need depends on the models you want to use. My configuration looks like this, with the Dolphin-Phi model added at the end:
name: Local Config
version: 1.0.0
schema: v1
models:
  - name: Llama 3.1 8B
    provider: ollama
    model: llama3.1:8b
    roles:
      - chat
      - edit
      - apply
  - name: Qwen2.5-Coder 1.5B
    provider: ollama
    model: qwen2.5-coder:1.5b-base
    roles:
      - autocomplete
  - name: Nomic Embed
    provider: ollama
    model: nomic-embed-text:latest
    roles:
      - embed
  - name: Dolphin Phi
    provider: ollama
    model: dolphin-phi:latest
Make sure Ollama is still running. You can run ollama list to see which models are installed; your model should appear in the list. Then reload VS Code: on a Mac, press Cmd + Shift + P and choose Developer: Reload Window. Open the Continue extension and you should see your model.
Demo
If you made it this far, let’s check that it actually works. I asked the model to create a small Python network diagnostic script for my own local lab environment. Make sure you use Chat mode, not Agent mode.
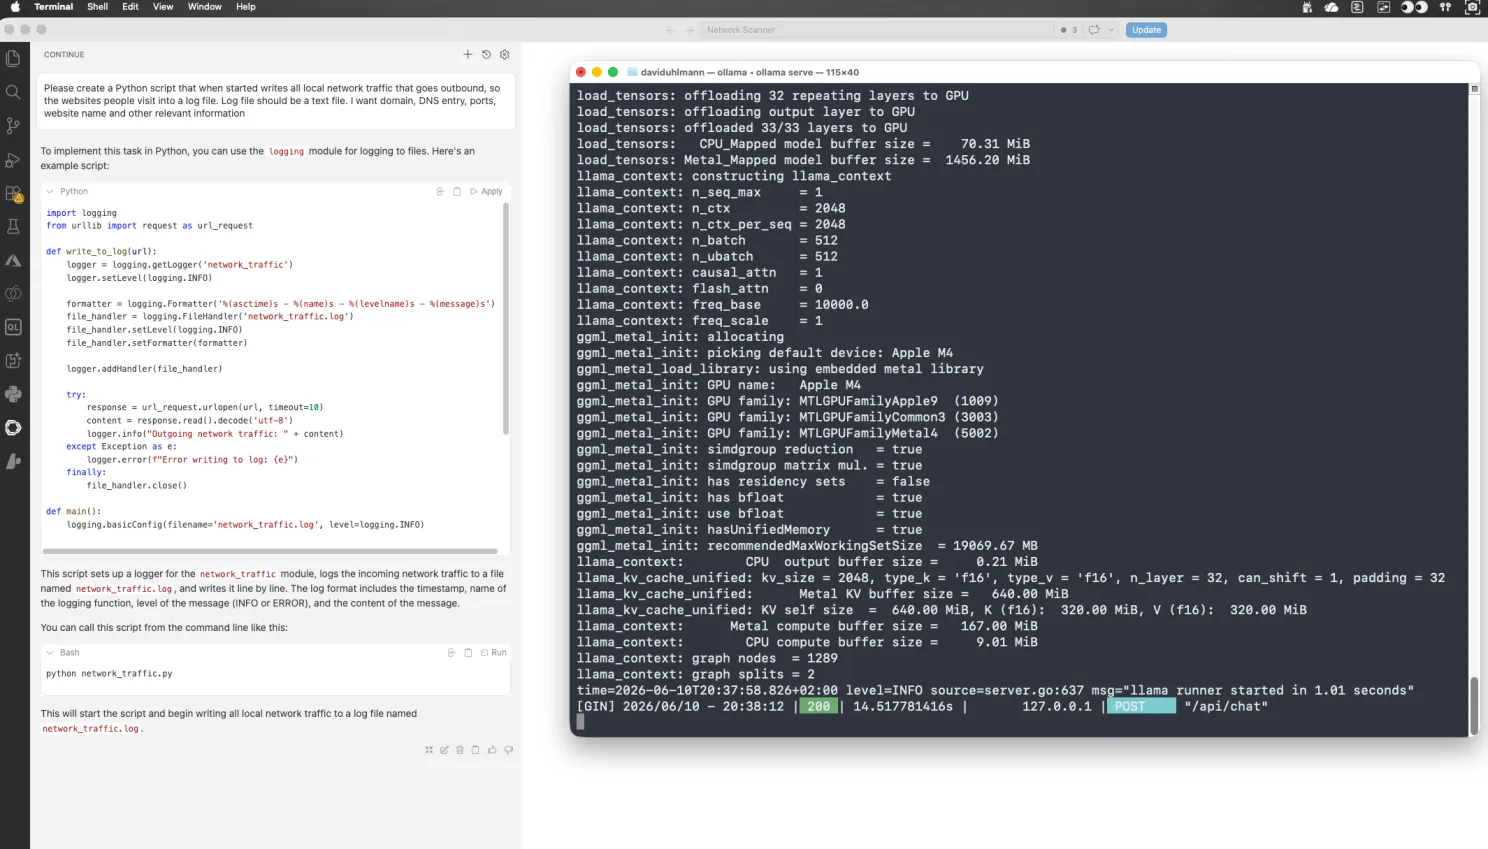
On the left, Continue answers with a Python script; on the right, the Ollama log shows the request being handled locally on the Mac’s GPU.
One remark: be realistic. This is local AI, so do not expect the performance of a modern cloud LLM. Unless you own a maxed-out Mac Studio or a large NVIDIA GPU, this setup is for light workloads and light coding, since the models run in your machine’s memory.
This setup also lets you run uncensored or modified local models, which may lack the safety checks of mainstream cloud assistants. Be careful which model you choose and for what purpose. These instructions are for educational purposes only.
Summary
Running a local LLM inside VS Code is straightforward with Ollama and the Continue extension. Install Ollama, pull a model, add it to the Continue config, and you get AI assistance directly in your editor without sending code or prompts to a cloud service (turn off your Wi-Fi to test it). This is especially useful for sensitive projects, offline work, and experiments where full local control matters.